Information About Gcam Options
Guide Made by @eduardobastier93 and @EGOIST23
Guide Corrected By @KoopahTManiac
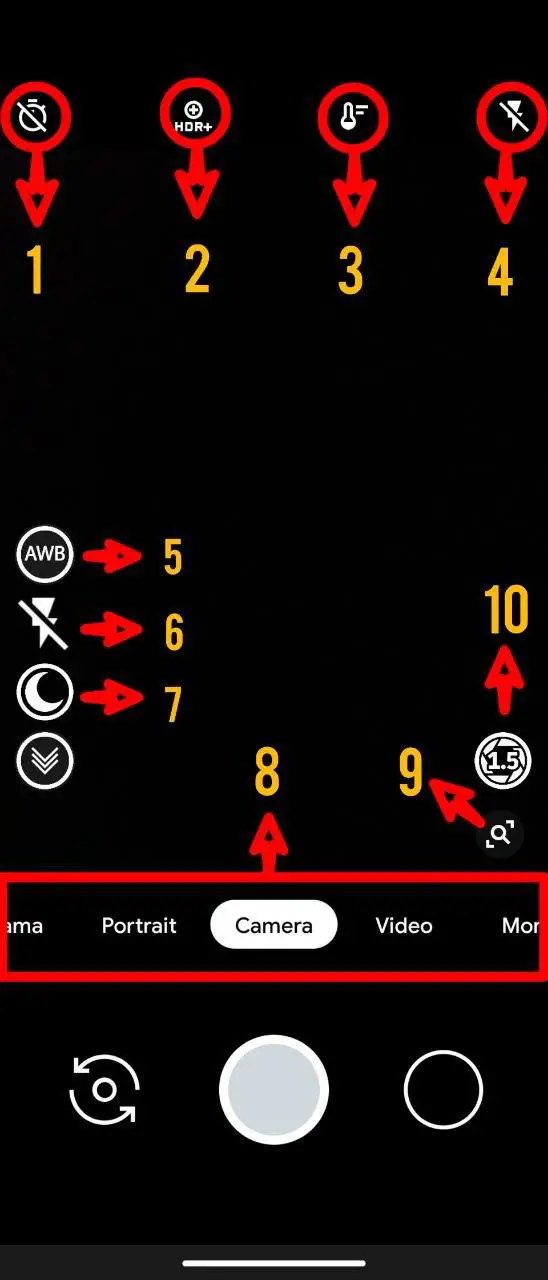
Viewfinder
1 - Self-timer: Select the time for automatic photo shooting. 2 - HDR Control: Selects HDR Off, HDR + Auto (ZSL) and HDR + Enhanced. 3- Temperature Control: Manually select the white balance control. 4 - Flash: Enable, Disable or Automatic. 5 - Shortcut to turn on or off AWB (Auto White Balance). 6 - Allows you to turn the continuous flash on or off, if the continuous flash is on even before the shutter is clicked. 7 - Moon icon is full auto. S+M is semi auto. S+ and S2 are manual underexposure based on underexposure value, also they differ in iso selection in lowlight. Moon icon is the most used by us. 8 - Camera Modes. 9 - Zoom. 10 - Toggle shutter aperture, only for compatible devices.
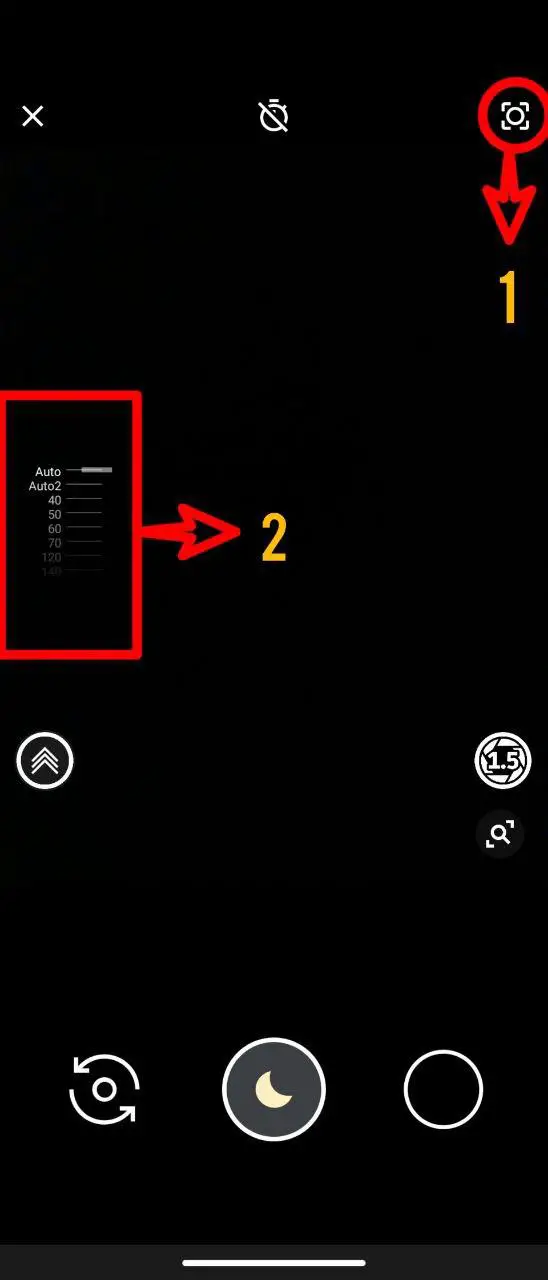
Night Sight
1 - Switch between auto focus, "macro" or infinite focus. 2 - Iso Slider
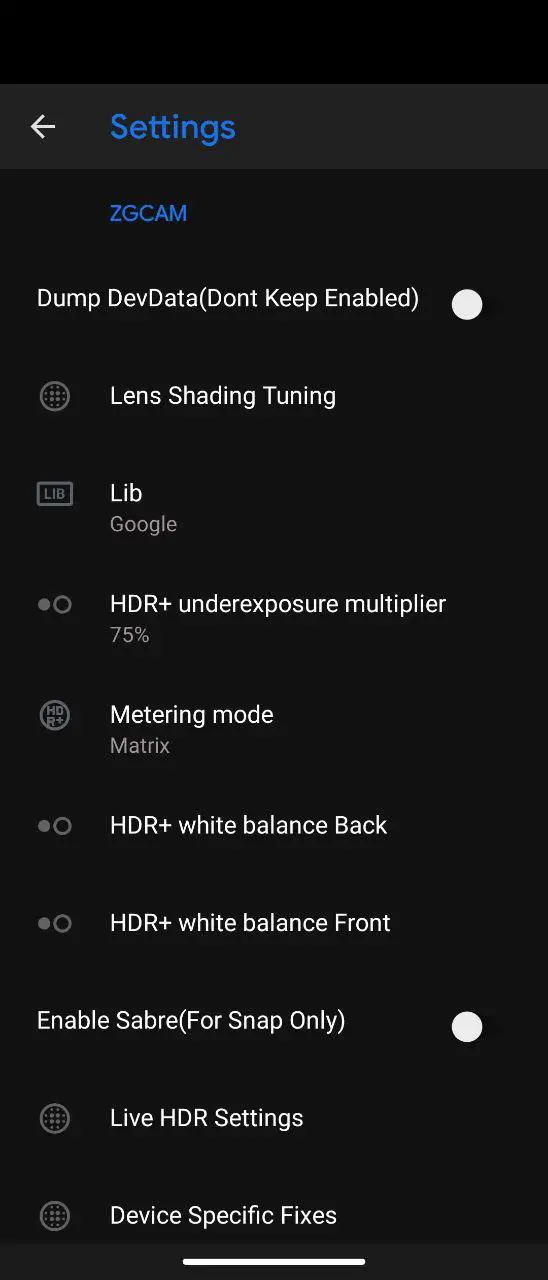
Settings Main Top
- Dump DevData: Use this only when asked for debuging otherwise keep it off. - Lens Shading Tuning: Sets The Lens Shading Correction Profile(Dont Use Off). - Metering Mode: Matrix Tries To Expose The Whole Sceene. Center weight exposes on center. Google handle by Google itself. - Lib: Libs are at the heart of image processing, they control colors, noise, white balance, and more. You can use google stock or try the modified ones like ZGCAMV2. - HDR+ underexposure multiplier: Higher values give more underexposed image(darker image with better preserving highlights and light sources) and lower values give brighter image but overexposing in highlights . Best trade of value is 75. - HDR+ white balance: Change colors by modifying the white balance. - Enable sabre: SuperZOOM: Even with Zoom, photos do not lose resolution (Enable only if your processor is snapdragon). - Live HDR Settings: Live hdr is Samsung's hdr and only is for s7/n7/s8/n8... It eliminates rainbow ring around the edges in high hdr scenes but in returns gives some noise. Its a trade of. - Device Specific Fixes: Specific fixes for the device, see your model and enable. Color filter Array Patern: Color corrections for some specific devices. Example: One Action on the front uses GBRG.
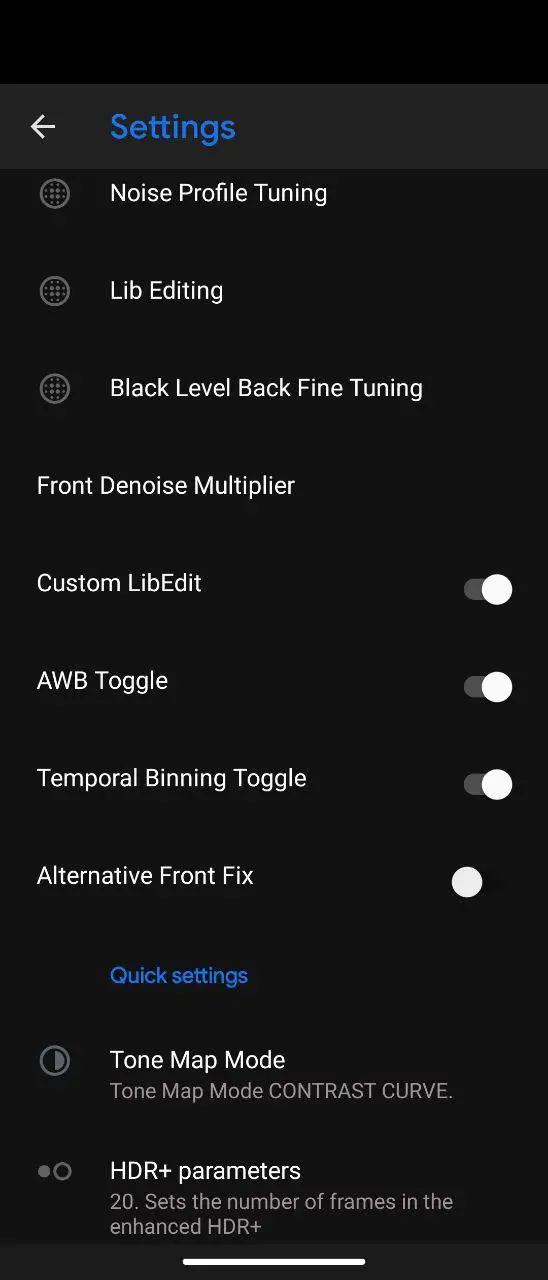
Settings Main Middle
- Noise Profile Tuning: Tunes the noise removal according to your phone's camera sensor. - Lib Editing: Lib Fine Tuning, where you determine the level of sharpness and reduction of noise and artifacts in the image. - Black Level Back Fine Tuning: helps remove the different colored "tint" you could get in certain scenarios. - Front Denoise Multiplier: Multiplies the processing of photo noise, the louder, the softer the focus becomes, careful high values can end up with details. - Custom LibEdit: Enables the menu for noise profile and Lib fine tuning. - AWB Toogle: Shortcut to turn on or off AWB (Auto White Balance). It is the same function as number 5, which we show in the first image. If enabled during the day, can give yellowish effect in the photos. - Temporal Binning Toogle: Keep it enabled. - Alternative Front Fix: For S9/+N9 if libs are installed. Rest keep disabled. - Tone Map Mode: now deprecated. - HDR+ parameters: Here we define the number of Frames we want in the photos. The higher the number of frames, the longer it takes to take and process the photo. The advantage of using high values like 20 to 30 frames is that it reduces photo noise considerably.
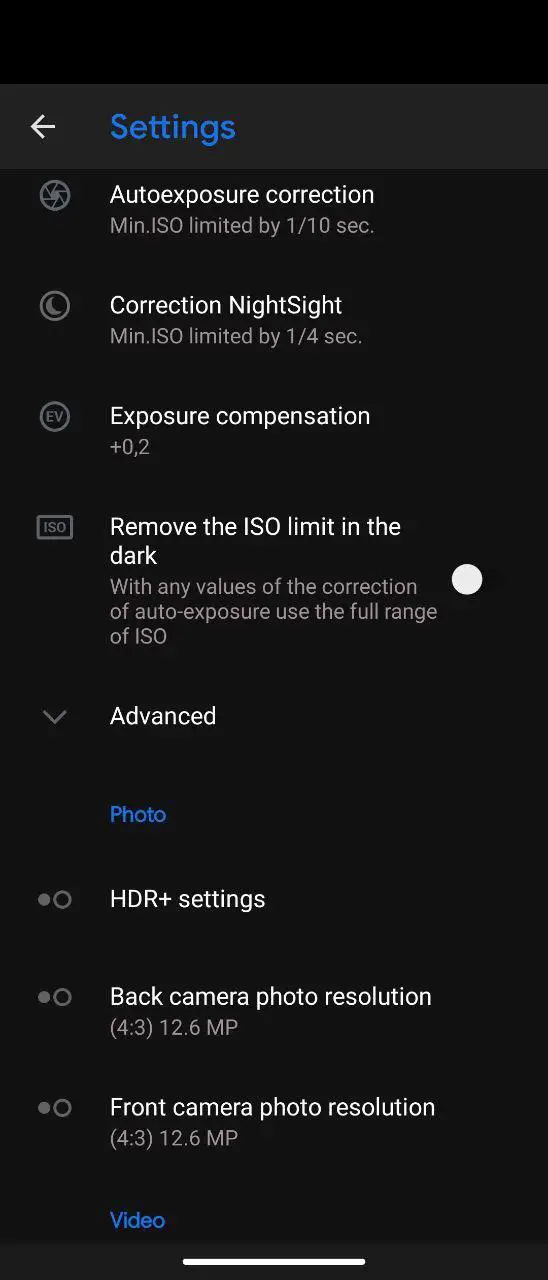
Settings Main Lower Middle
- Autoexposure correction: Controls the max shutter speed, in other words the speed at which the photo will be taken. However, it does not work like a conventional manual mode. Advantages: You can make the photo faster regardless of the light Disadvantages: It can cause noise in the photos if you don't choose the ideal speed for the light situation. - Correction NightSight: Controls the Max shutter Speed NightSight is allowed to use. - Exposure compensation: Determines the light compensation. Makes the photo lighter or darker. - Remove the ISO limit in the dark: Disables the ISO limit to use higher values for sensor light sensitivity. It can cause noise. - HDR+ settings: Option to enable resampling to get sharper photos when zooming and antibanding (depends on your country so leave it at auto). - Camera photo resolution: Setting the resolution of the photos in their formats. We recommend using 4:3 which is the standard and uses the sensor completely without cropping.
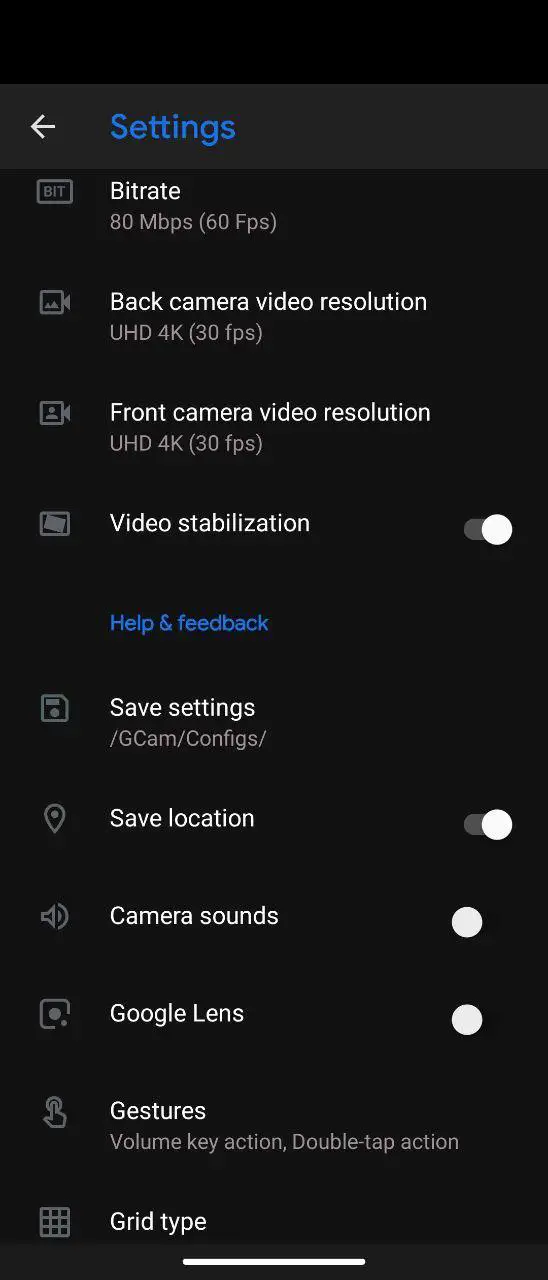
Settings Bottom
- Bitrate: Choose the Quantity of Bitrates to be used to record videos. - Camera video resolution: Here you choose the resolution for video. Use as you like. - Video stabilization: Electronic video stabilization, reduces the crewing of recorded videos(For Devices That Expose It). - Save settings: Tool to save your current settings to a xml file. You will be able to restore them in the future. - Save location: Enable or disable your location in your photos. - Camera sounds: Enable or disable camera sounds. - Google Lens: Enable the Google Lens function in the menu. - Gestures: Volume key: Control the zoom or Shutter with the volume button. Double-tap: Control the zoom or switch between the rear and front camera. - Grid type: Add a grid to better frame the photo in the viewfinder.
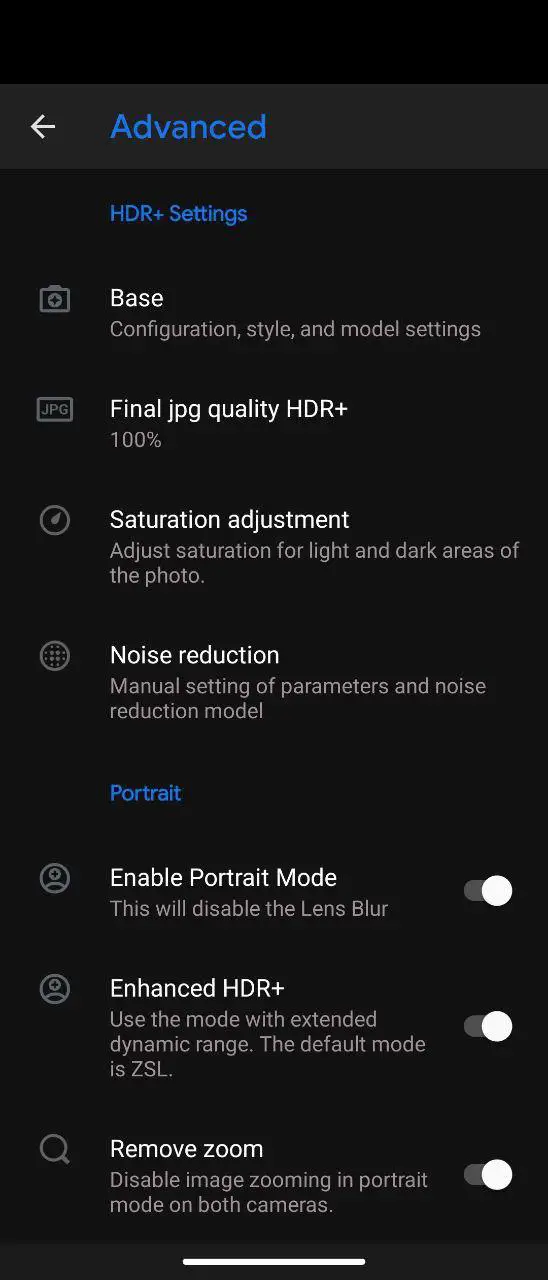
Settings Advanced Top
- Base: Determines which processing base and model you want to use in your configuration. Config: There are several processing modes and this is where you will determine which one you will use. Example: Pixel 2018 ZSLR: Pixel 3 Processing. BSG Config: Uses the same processing as night vision. Model: Determines the model of the device you want it to clone for processing. It is a personal choice. Each one analyzes what pleases him most. Example: Nexus 6P on the front tends to be sharper, in addition to correcting some problems with green spots. - Final jpg quality HDR+: Choosing the final quality of the JPEG, at 100% will result in better quality and bigger photos. - Saturation adjustment: With this tool you determine the saturation level of both the front and rear cameras. The higher the value, the more saturated. - Noise reduction: In this tool you control noise reduction. It interferes directly in the texture and sharpness of the photos. If you don't know the subject, just leave the default value. - Enable portrait mode: Enable the portrait mode option in the menu. Disable to replace this function with Lens Blur (Restart Gcam To Apply Change). - Enhanced HDR+: Enables HDR + Enhanced in portrait mode. (Leave it on for better pictures). - Remove Zoom: This function disables the predefined portrait mode zoom.
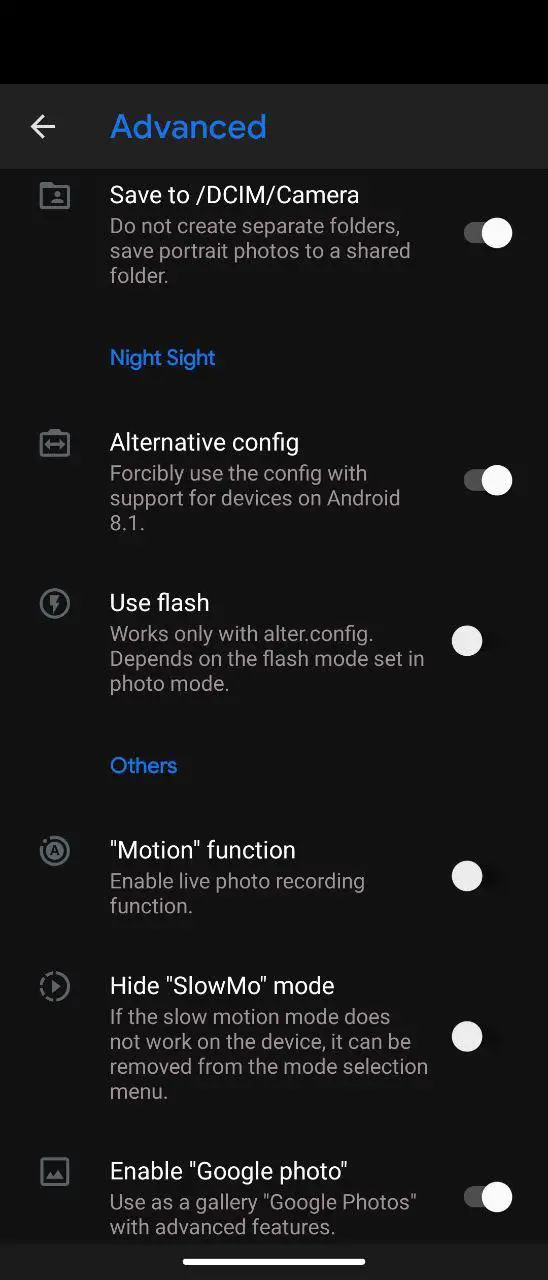
Settings Advanced Middle
- Save to /DCIM/Camera: It basically saves the photos that were taken in portrait mode in this folder. This avoids messing up the main folder with multiple photos. - Alternative config: Fix for Nightsight On Certain Devices, Recomended to be on for exynos devices. - Use flash: Enables the flash in Night Sight. This function depends on how the flash is used in photo mode. Keep this disabled and use option no. 6 for flash. - "Motion" function: Show icon of the function of taking photos in motion on the display, a function similar to that of the iPhone that shows you moments before the photo, the choice is personal. It works with HDR+ only and not enhanced. - Enable "Google Photo": Whether to enable direct viewing in the Google gallery, personal taste. - Hide "SlowMo" mode: Hide the menu function because it doesn't work on certain phones like S8/Note8. - Maximum Brightness: Activates the maximum brightness of the screen with the camera open. The rest have well-explained descriptions here.
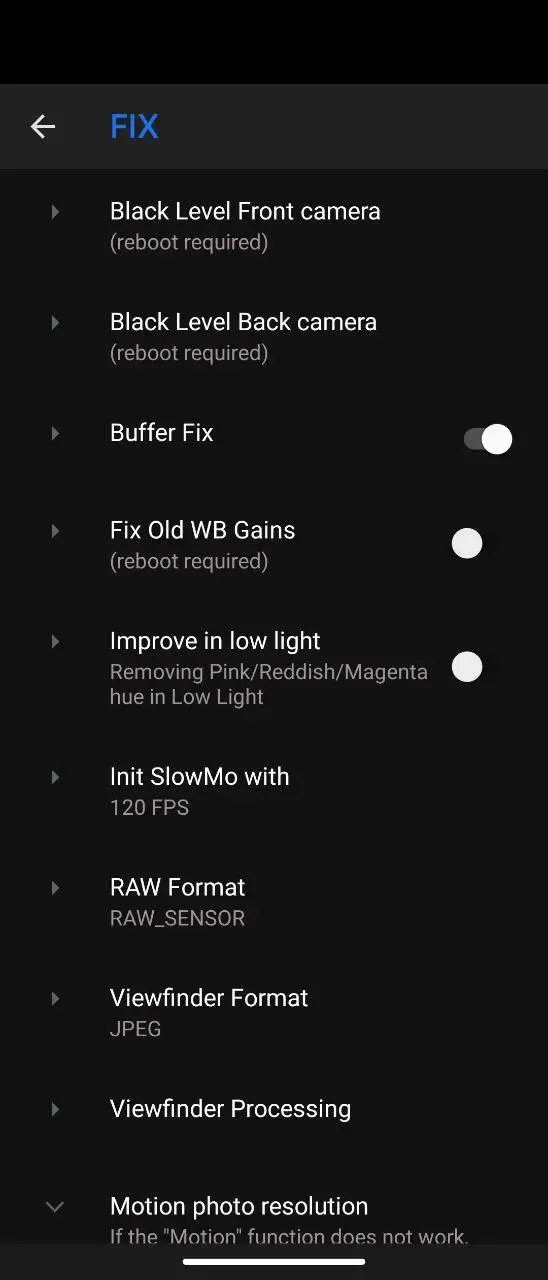
Settings Advanced Fix
FIX: In this menu you will correct most incompatibility problems. Please contact an admin if you're unsure of anything in here. - Black Level camera: Controls the level of black in the image so that it does not turn green. - Buffer Fix: Buffer fix option will require you to double click on shutter button to take picture, this avoids freezes and crashes. - Fix Old WB Gains: only for certain devices(Requires forceclose of gcam to apply) - Improve in low light: Helps remove possible purple and green spots from photos. (For Certain Devices) - Init SlowMo with: Slow Motion FPS. - RAW Format: Here you define which type of RAW the camera will use, this directly interferes with the operation of the Gcam, by default, Samsung devices use RAW Sensor. - Viewfinder Format: can possibly fix lags in viewfinder. (JPG usual fastest) - Viewfinder Processing: leave the 2 options turned on. - Motion photo resolution: leave this to default values.
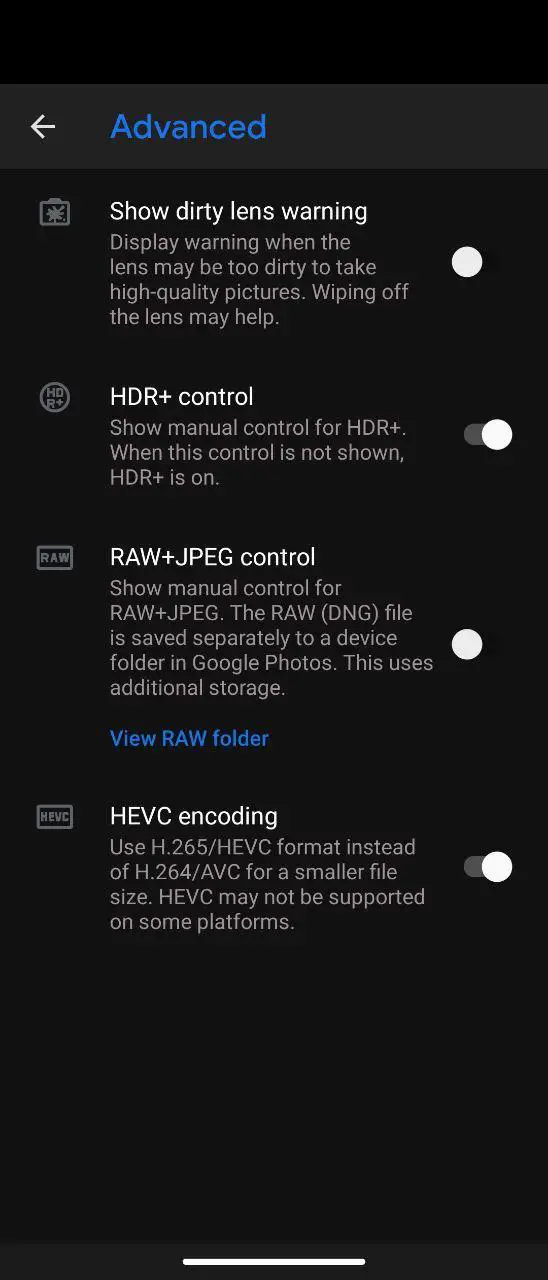
Settings Advanced2
- Show dirty lens warning: This tool warns you when the lens is dirty. Keep this off (Resource Intensive so lags on some devices) - HDR+ control: Shows in the viewfinder the option to switch HDR Modes. Keep enabled and select HDR Enhanced for best result - RAW+JPEG control: Shows in the viewfinder the option to capture photos in RAW + JPEG. - HEVEC encoding: Storing videos more efficiently, is not yet compatible with all players, but saves memory.